DIYbrico | Discover, Create, Inspire

Exploring Unique Tie Dye Patterns: A Guide to Creative Techniques and Designs

Table of Contents
Tie Dye Patterns is a fun and creative way to express yourself through colors and patterns. Whether you’re a beginner or have some experience, there’s always something new to learn about this vibrant craft. In this guide, we’ll explore various tie dye patterns, from classic styles to unique techniques that can help you create stunning designs. Get ready to unleash your creativity and make some eye-catching pieces!
Key Takeaways
- Tie dyeing allows for endless creativity with colors and patterns.
- Classic techniques like spiral and bullseye are great for beginners.
- Innovative methods, such as galaxy and watercolor, offer fresh twists on traditional styles.
- Seasonal inspirations can make your tie dye projects festive and fun.
- Experimenting with different techniques can lead to unique and personal designs.
Exploring Classic Tie Dye Patterns
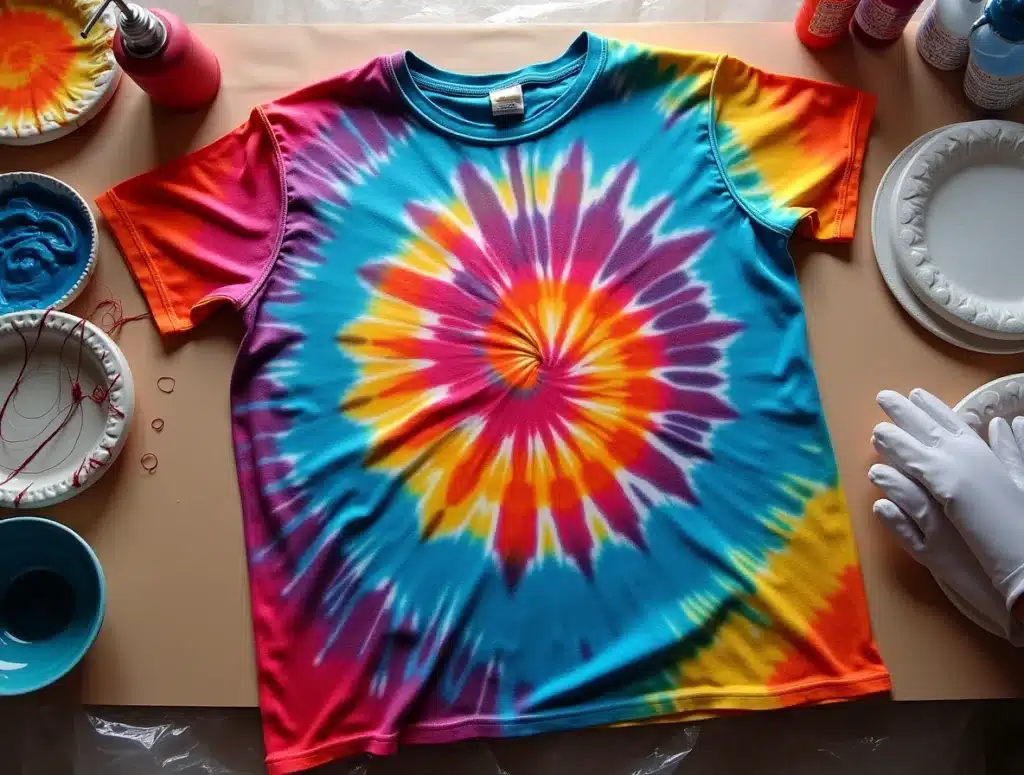
Tie dye has been around for ages, and some patterns have really stood the test of time. These classic designs are popular for a reason – they’re relatively easy to achieve and always look cool. Let’s check out some of the most iconic tie dye techniques.
Spiral Tie Dye Technique
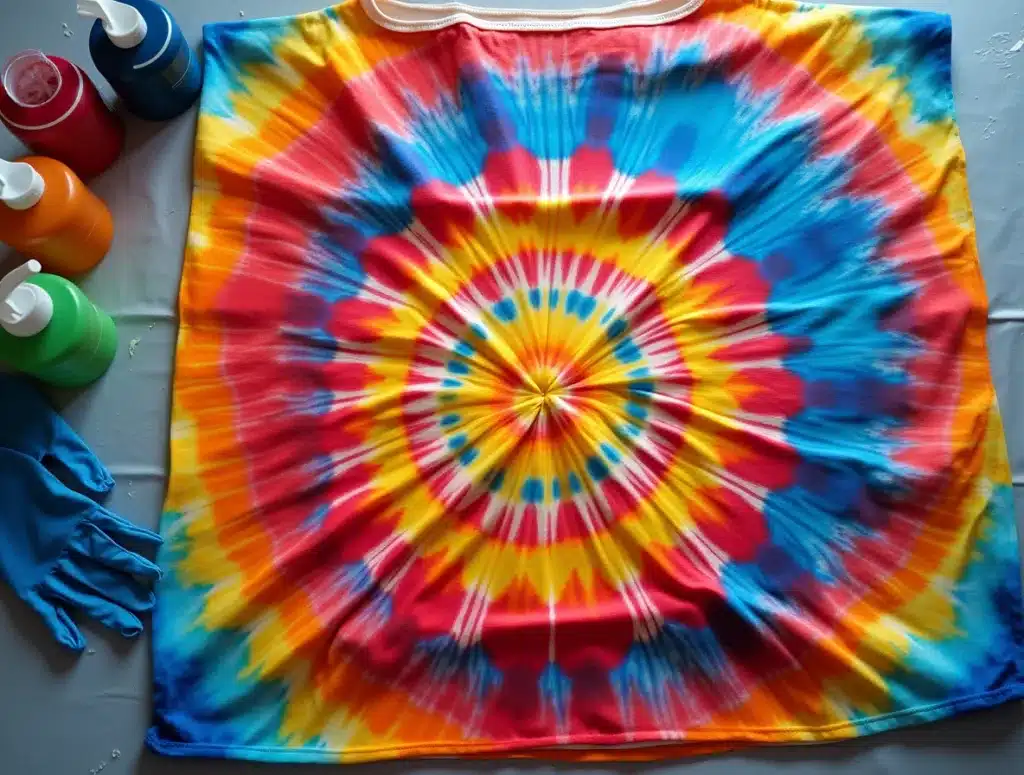
The spiral is probably the first thing that comes to mind when you think of tie dye. It’s a simple yet effective way to create a mesmerizing design. To get started, pinch the center of your fabric and twist it into a tight spiral. Then, secure it with rubber bands, dividing it into pie-shaped sections. Apply your dyes to each section, using different colors for a vibrant effect. The spiral tie dye technique is super versatile, and you can change it up by using different folding methods or color combinations.
Bullseye Tie Dye Technique
The bullseye pattern is another classic that’s easy to recognize. This technique involves pinching and gathering the fabric at one or more points, then securing it with rubber bands to create concentric circles. Dye is then applied to the different sections, creating the bullseye effect. It’s a great way to use up leftover dye, and you can create some really interesting variations by using different spacing between the rubber bands or by adding multiple bullseyes to a single garment. The bullseye tie-dye technique is a fun way to add a bold, graphic element to your tie dye projects.
Stripes Tie Dye Technique
If you’re looking for something a little more structured, stripes are the way to go. This technique involves folding the fabric in an accordion style, then securing it with rubber bands at regular intervals. Dye is then applied to the different sections, creating stripes of color. You can create horizontal, vertical, or even diagonal stripes, depending on how you fold the fabric. The stripes tie-dye technique is a great way to experiment with color blocking and create a modern, graphic design. Whether you want bold, contrasting stripes or subtle, blended hues, this technique offers a lot of room for creativity. You can even use a white acrylic pen to add some shiny accents.
Tie dye is all about experimenting and having fun. Don’t be afraid to try new things and see what happens. The best part is that even if you mess up, you’ll still end up with something unique and interesting.
Innovative Tie Dye Techniques
Ready to move beyond the basics? These techniques take tie dye to a whole new level. I remember the first time I tried the galaxy technique – it looked like a total mess at first, but the final result was incredible! Don’t be afraid to experiment; that’s where the magic happens.
Watercolor Tie Dye Technique
This technique mimics the soft, blended look of watercolor paintings on fabric. It’s all about using diluted dyes and a light touch to create subtle gradients and washes of color. It’s way less intense than traditional tie dye, which is great if you’re going for a more chill vibe. I tried it on a white linen shirt, and it came out looking like something you’d find in a fancy boutique. Here’s what you’ll need:
- Fabric dyes (liquid or powder)
- Water
- Spray bottles or brushes
- White or light-colored fabric
Galaxy Tie Dye Technique
Transform your clothes into a celestial masterpiece with the galaxy tie dye technique. This involves using bleach to create star-like patterns on a dark background, followed by applying vibrant colors to mimic nebulae. It’s a bit more involved, but the results are out of this world. I saw someone do this on a hoodie, and it looked like they’d actually captured the night sky. You can even explore different stitch patterns to make it even more unique.
- Dark-colored fabric (navy or black works best)
- Bleach
- Spray bottle
- Fabric dyes (pinks, purples, blues)
- Toothbrush or sponge
Reverse Tie Dye Technique
Instead of adding dye, you’re taking it away! Reverse tie dye involves using bleach to remove color from a dark fabric, creating unique patterns. It’s super satisfying to see the colors fade and reveal the design. I messed this up once by leaving the bleach on too long, so definitely keep an eye on it. Here’s a quick guide:
- Dark-colored fabric
- Bleach
- Rubber bands or string
- Spray bottle or applicator
Reverse tie dye is a great way to upcycle old clothes or give a new twist to something you already own. It’s also surprisingly forgiving – even if you make a mistake, it often just adds to the unique look of the piece.
Seasonal Tie Dye Inspirations
Christmas Tie Dye Technique
Okay, so who says tie dye is just for summer? Let’s bring some festive cheer with Christmas tie dye! Think about using classic holiday colors like red, green, and gold. You can create patterns that mimic Christmas trees, ornaments, or even candy canes. It’s a fun way to add a personal touch to your holiday wardrobe or create unique gifts. Imagine a tie-dyed Christmas stocking or a festive t-shirt for your next holiday party. You could even try using glitter dye for an extra sparkle!
Summer Vibes Tie Dye
Summer and tie dye go together like peanut butter and jelly. For summer tie dye, think bright, vibrant colors that scream sunshine and good times.
Here are some ideas:
- Beach-themed: Blues, yellows, and oranges to mimic the ocean and sunset.
- Floral patterns: Incorporate flower shapes or use floral color palettes.
- Ice dye: Experiment with ice dyeing for unique, summery patterns.
Summer tie dye is all about having fun and expressing your personality. Don’t be afraid to experiment with different techniques and color combinations to create something truly unique. It’s the perfect way to add a pop of color to your summer wardrobe.
Halloween Tie Dye Ideas
Time to get spooky with Halloween tie dye! This is where you can really get creative with dark and eerie color combinations. Think blacks, oranges, purples, and greens. You can create designs that feature ghosts, pumpkins, spiderwebs, or even a spooky spiral tie dye technique. It’s a fantastic way to make your own Halloween costume or decorate your house with some unique, tie-dyed decorations. Imagine a tie-dyed tablecloth with spiderwebs or a t-shirt with a ghostly design. The possibilities are endless!
Unique Tie Dye Styles
Time to get into some of the more unusual tie dye techniques out there. These aren’t your average spiral or bullseye patterns; these are styles that really stand out and let you express yourself in a different way. Let’s explore some unique approaches to tie dye that can add a special touch to your creations.
Shibori Tie Dye Technique
Shibori is a Japanese tie dye technique that’s way more than just rubber bands and dye. It involves folding, twisting, and compressing fabric to create intricate patterns. It’s an ancient art form, and the results can be absolutely stunning. You can use wooden blocks, poles, or even just your hands to shape the fabric before dyeing. The cool thing about Shibori is that every piece comes out unique, with its own character. It’s a bit more involved than your basic tie dye, but the payoff is worth it. If you’re looking for something with a bit more history and depth, give Shibori a try.
Marbling Tie Dye Technique
Marbling tie dye is where things get really interesting. Instead of directly applying dye to the fabric, you float the dye on top of a liquid bath (usually water thickened with something like cornstarch). Then, you carefully lay the fabric onto the surface, letting the dye transfer in a random, marbled pattern. It’s like creating art on water! This technique is awesome for getting those organic, flowing designs that you just can’t achieve with traditional tie dye methods. Plus, it’s super fun to watch the colors swirl and blend. If you’re revamping your wardrobe or adding a personal touch to accessories, marble tie dye is the perfect way to express your creativity with color.
Yin Yang Tie Dye Technique
The Yin Yang tie dye technique is all about balance and harmony. Inspired by the ancient symbol representing the interconnectedness of opposites, this technique allows you to infuse your tie-dye designs with a sense of balance and unity. The idea is to create a design that features the classic Yin-Yang symbol, with its contrasting yet complementary halves. This can be achieved through careful folding and dyeing, using contrasting colors to highlight the two halves of the symbol. It’s a cool way to add some meaning to your tie-dye, and it looks pretty awesome, too. It’s not just about the look; it’s about the idea behind it. This technique allows you to express your commitment to peace, love, and harmony with bold tie-dye style.
Tie dye is more than just a craft; it’s a way to express yourself and create something truly unique. Don’t be afraid to experiment with different techniques and colors to find your own style. The possibilities are endless, and the results can be amazing.
Creative Tie Dye Projects
Tie dye isn’t just about making cool shirts; it’s a way to bring color and personality into all sorts of things around you. Let’s explore some fun projects that go beyond the basic tee!
Tie Dye Home Decor
Want to spice up your living space? Tie dye can do wonders! Think about transforming plain white curtains into vibrant, eye-catching window treatments. Or, how about giving old pillowcases a new lease on life with a burst of color? Tie-dyed tapestries can also make a bold statement on any wall. You could even tie dye a tablecloth for a fun, festive touch to your dining area. It’s all about adding those unique, personal touches that make your house feel like home. For example, you can use tie dye techniques to create unique patterns on pillowcases.
I remember this one time I tie-dyed a shower curtain. It was a disaster at first – the colors bled everywhere! But after a few washes, it turned into this amazing, watercolor-like effect. It totally brightened up my bathroom.
Fashionable Tie Dye Accessories
Okay, so you’ve got the shirts down. What about accessories? Scarves are a super easy and fun way to add a pop of color to any outfit. Bandanas are another great option – wear them in your hair or around your neck, or even tie them to your bag for a little extra flair. And don’t forget about socks! Tie-dyed socks are a fun way to show off your personality. Plus, you can even try tie-dyeing canvas shoes for a truly unique look. Here’s a quick guide to get you started:
- Scarves: Lightweight fabrics work best.
- Bandanas: Cotton is your go-to.
- Socks: Experiment with different sock lengths.
Kids’ Tie Dye Crafts
Tie dye is an awesome activity to do with kids. It’s fun, it’s messy (in a good way!), and it lets them express their creativity. Think about tie-dyeing tote bags for carrying books or toys. Or, how about making colorful headbands? You could even tie dye plain white paper to create unique backgrounds for drawings or paintings. The possibilities are endless! Just make sure to supervise them closely, especially when working with dyes. Here are some ideas:
- Tote bags for school or play.
- Headbands to accessorize their outfits.
- Tie-dyed paper for art projects.
Advanced Tie Dye Techniques
Okay, so you’ve mastered the basics, huh? Spiral, bullseye, or stripes? It’s all child’s play. Now we’re talking the real deal. These techniques require a bit more patience, a dash of skill, and a whole lot of creativity. Get ready to level up your tie dye game!
Ice Dye Technique
Ice dyeing is where things get interesting. Instead of mixing your dyes with water, you sprinkle the powder directly onto ice placed over your fabric. As the ice melts, it creates these amazing, unpredictable patterns. It’s like letting nature do the work for you. Seriously, each piece comes out totally unique. I tried it last month, and the results were mind-blowing. It’s a bit messy, I won’t lie, but the payoff is worth it. You’ll need a wire rack, a container to catch the melted ice, and some good-quality dye powder. Pro tip: Use different colors next to each other and watch them blend in the most awesome ways.
Kaleidoscope Tie Dye Technique
This one’s all about precision folding. You’re basically creating a symmetrical design that repeats itself, like, well, a kaleidoscope. It involves folding the fabric in a way that when dye is applied, it creates a mirrored effect. It’s tricky to get the folds just right, but when you nail it? BAM! Instant masterpiece. I remember trying this for the first time. My brain hurt for a solid hour, but the final result was so worth the effort. It’s a great way to make creative DIY projects that look super complex but are actually based on simple geometry.
Diamond Tie Dye Technique
Diamond tie dye is all about creating geometric diamond shapes on your fabric. It involves a series of folds and precise dye application to achieve this effect. It’s not as hard as it looks, trust me. The key is to take your time and make sure your folds are crisp and even. I messed up the first time because I rushed it, and the diamonds came out all wonky. But hey, that’s how you learn, right? Here’s a quick rundown:
- Fold your fabric into a square.
- Fold the square diagonally to create a triangle.
- Continue folding it into smaller triangles.
- Apply dye to the edges of the triangle.
Honestly, tie dye is more than just a craft; it’s a way to express yourself. Don’t be afraid to experiment, make mistakes, and learn from them. That’s how you develop your own unique style.
Fun Tie Dye Patterns for Beginners
Tie dye is super fun, and it’s way easier than you might think to get started! You don’t need a ton of fancy equipment or years of experience to create something cool. These patterns are perfect if you’re just starting out and want to get a feel for how dye works and how different tying methods affect the final design. The best part is that even simple techniques can produce really awesome and unique results.
Crumple Tie Dye Technique
Okay, so the crumple technique is probably the easiest one out there. Seriously, it’s almost impossible to mess this up. You just grab the fabric and scrunch it up into a ball. Then, you secure it with rubber bands. The more random the crumples, the more interesting the pattern will be. It’s great for a kind of abstract, all-over design. I like to use a few different colors for this one to get a really vibrant effect. It’s also a good way to use up leftover dye from other projects. Just squirt the dye onto the crumpled fabric, making sure to get into all the nooks and crannies. Let it sit, rinse, and you’re done!
Freestyle Tie Dye Technique
This is where you can really let your inner artist shine! There aren’t any rules with freestyle tie dye. You can squirt, drip, brush, or sponge the dye onto the fabric however you want. It’s like painting, but on a shirt! I’ve seen people use stencils, create splatter effects, or even write words with dye. The key is to have fun and experiment. If you’re nervous about messing up, start with a small piece of fabric or an old T-shirt. You can also use fabric markers to add details after the dye has set. It’s a great way to make something truly one of a kind. For inspiration, check out some stitch patterns online.
Chevron Tie Dye Technique
The chevron pattern looks way more complicated than it actually is. Basically, you’re just folding the fabric in an accordion style and then dyeing it in sections. The key is to make sure your folds are neat and even. This will give you those crisp, clean lines that make the chevron pattern so recognizable. You can use one color or multiple colors, depending on the look you’re going for. I like to use contrasting colors to really make the pattern pop. It’s a bit more involved than the crumple technique, but the results are totally worth it. Plus, it’s a great way to impress your friends with your tie dye skills.
Tie dye is all about experimenting and having fun. Don’t be afraid to try new things and see what happens. Even if you don’t get the exact result you were expecting, you’ll still end up with something unique and cool. And who knows, you might even discover a new favorite technique along the way!
Final Thoughts on Tie Dyeing
So, there you have it! Tie dyeing is not just a craft; it’s a fun way to express yourself and make something totally unique. With all the different techniques we’ve covered, there’s no limit to what you can create. Whether you’re going for a classic spiral or trying out something wild like the marbling technique, just remember to have fun with it. Don’t stress too much about getting it perfect—sometimes the best designs come from happy accidents. So grab your dyes, pick your fabric, and let your creativity flow. Happy dying!
Frequently Asked Questions
What materials do I need for tie-dyeing?
To tie-dye, you will need plain white fabric, fabric dye, rubber bands, gloves, and a spray bottle or squeeze bottle for applying the dye.
Can I use any type of fabric for tie-dye?
Most natural fabrics like cotton, rayon, and linen work best for tie-dye. Synthetic fabrics may not absorb the dye well.
How long do I leave the dye on the fabric?
It usually takes about 6 to 8 hours for the dye to set. For the best results, follow the instructions on the dye package.
Is tie-dye safe for kids?
Yes, tie-dye can be safe for kids if done with adult supervision. Make sure to use non-toxic dyes and protect surfaces.
Can I wash my tie-dye items?
Yes, but wait at least 24 hours after dying. Wash them separately in cold water to prevent colors from bleeding.
What is the best way to store my tie-dye supplies?
Store your tie-dye supplies in a cool, dry place. Keep dyes in their original containers and out of reach of children.