DIYbrico | Discover, Create, Inspire

7 Easy Steps to learn how to Crochet a Magic Circle Like a Pro
Learn how to crochet a magic circle with our step-by-step guide!

Table of Contents
Crocheting is an art that opens up a world of creative possibilities. One of the most useful techniques for beginners and seasoned crafters alike is the magic circle (also known as the magic ring). This simple yet essential method helps you learn how to Crochet a Magic Circle and start projects like amigurumi, hats, and blankets with a tight, seamless beginning.
But don’t let the name fool you – while it sounds mystical, mastering the magic circle is easier than it seems! In this comprehensive guide, we’ll walk you through everything you need to know about the magic circle, including what it is, how to make it, and why it’s such an essential skill for crocheters. Ready to level up your crochet game? Let’s dive in!
What is a Magic Circle in Crochet?
Before we get to the how-to, it’s important to understand what a magic circle is.
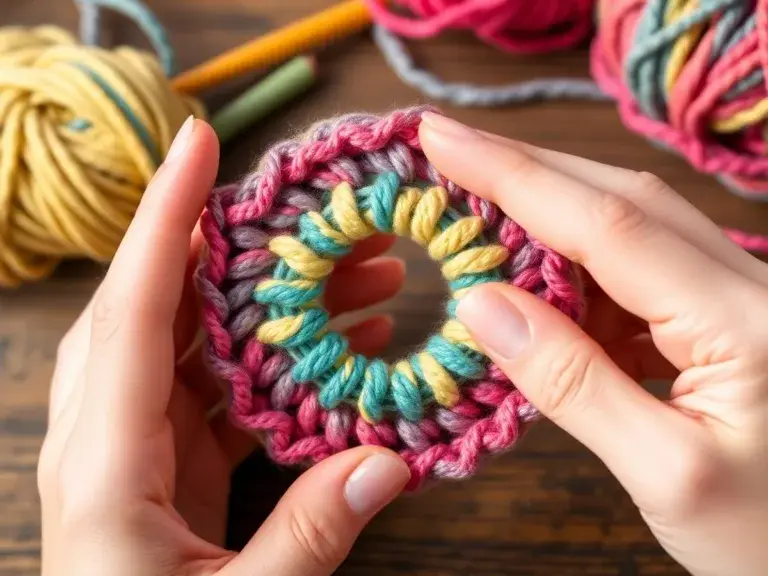
In crochet, a magic circle is a technique used to create a flexible loop at the start of your project. It’s often used when crocheting in the round (for things like amigurumi or circular motifs) and ensures there’s no gap in the centre of your piece. Without this technique, your first stitch would leave a small hole in the middle, which can affect the look and functionality of your project.
Why Use a Magic Circle?
You might be asking, “Why not just chain and join to start my project?” While that’s a fine technique, the magic circle offers several advantages:
- Tighter Finish: The magic circle allows you to pull the loop tight, closing up any gaps in the center of your work.
- Flexible Size: You can adjust the size of the loop as you go, making it ideal for projects that require a very precise start.
- Better for Amigurumi: When making 3D objects, like stuffed animals, the magic circle is a lifesaver to prevent any holes in the body parts.

How to Crochet a Magic Circle: Step-by-Step Instructions
Now that we know what the magic circle is let’s go through the process of creating one. Follow these simple steps, and you’ll be making magic circles like a pro!
Step 1: Create a Loop
Start by holding your yarn with the tail facing you. With your fingers, create a loop by crossing the working yarn over the tail yarn.
Step 2: Insert Your Hook
Place your crochet hook under the loop of yarn and grab the working yarn with your hook. This is where the magic happens – you’re setting yourself up for the first round of stitches!
Step 3: Yarn Over
Now, yarn over (wrap the yarn over your hook) and pull it through the loop you just made. You’ve now got your first chain stitch!
Step 4: Crochet Your Stitches
Crochet the required number of stitches into the loop. Commonly, amigurumi projects start with 6 single crochet (sc) stitches, but this can vary based on your pattern.
Step 5: Pull the Tail Tight
Once you’ve crocheted your stitches, grab the tail end of your yarn and pull it tightly. This will close the circle, leaving you with a smooth and seamless centre.
Step 6: Continue Crochet
Continue crocheting in the round, joining each round as your pattern instructs. You’ll now have a solid foundation without any holes!
Tips for Perfecting Your Magic Circle
- Tighten Carefully: When pulling the yarn tail, don’t over-tighten it to the point where you can’t continue crocheting. It should be snug but not too tight.
- Use Stitch Markers: If you’re crocheting a project with multiple rounds, use stitch markers to keep track of your rounds.
- Practice, Practice, Practice: Like any crochet skill, mastering the magic circle takes practice. If at first, you don’t succeed, try again. You’ll get there!
Common Mistakes to Avoid
Even experienced crocheters can slip up with the magic circle. Here are some of the most common mistakes and how to fix them:
1. Leaving a Gap in the Center
This usually happens if you don’t pull the yarn tail tight enough. Make sure to pull the tail until the center is completely closed.
2. Losing Track of Your Stitches
If you’re not careful, it’s easy to forget how many stitches you’ve crocheted into the circle. Always count your stitches as you go to avoid confusion later on.
3. Not Starting the Magic Circle Correctly
If you don’t make the loop properly or your hook isn’t placed in the right spot, you might end up with a twisted circle or an uneven starting point. Be mindful of the placement of your yarn and hook!
Alternative Methods for Starting Projects in the Round
While the magic circle is great, it’s not the only method for starting projects in the round. Here are a couple of alternatives:
Chain and Join
This is the traditional method where you chain a few stitches, form a ring, and then join to the first stitch. It’s easier but doesn’t eliminate the hole in the center, which can be a deal-breaker for some projects.
Adjustable Ring
An adjustable ring is another name for the magic circle. It’s the same method, just with a different name, and it’s often used interchangeably in patterns.
When to Use a Magic Circle
The magic circle is most beneficial in the following scenarios:
- Amigurumi: When creating small, stuffed toys or animals, you need a tight, seamless start to avoid visible gaps.
- Circular Shawls or Hats: Projects worked in the round, like hats or shawls, often benefit from the clean start the magic circle provides.
- Flowers, Mandalas, and Doilies: Decorative items that start in the center and work outward are perfect candidates for the magic circle.
What You Need to Start a Magic Circle
To get started, all you need is:
- Yarn: Any yarn suitable for your project. Wool, cotton, or acrylic will work fine.
- Crochet Hook: A hook that matches the thickness of your yarn.
- Scissors: For cutting the yarn when you’re done.
- Stitch Marker (Optional): To mark the beginning of your rounds.
Conclusion
Mastering the magic circle can open up a whole new world of crochet possibilities. From amigurumi to intricate shawls, this technique provides a clean, tight start that makes your projects look professional from the very first stitch. It might take a little practice, but once you get the hang of it, you’ll wonder how you ever crocheted without it!
Now, go ahead and give it a try. Your crochet creations will thank you!
FAQs
1. Can I use the magic circle for all crochet projects?
While it’s best suited for projects worked in the round, like amigurumi and hats, it can also be used for other circular projects that require a seamless start.
2. How do I make a magic circle with a double crochet stitch?
The process is exactly the same, but instead of single crochet, you’d yarn over and crochet the double crochet stitches into the loop.
3. What if I can’t get the magic circle to close tight enough?
Make sure you’re pulling the yarn tail snugly and evenly. If it still won’t close, double-check that your starting loop is formed correctly.
4. Is there an easier method than the magic circle for beginners?
If you’re just starting out, try the chain-and-join method first. It’s a bit simpler, though it leaves a small gap in the center.
5. Can I use the magic circle for projects worked in rows?
The magic circle is mainly used for projects worked in the round. If you’re working in rows, you’d usually start with a foundation chain.