DIYbrico | Discover, Create, Inspire

Creative and Fun Paper Bag Crafts for Kids: 10 Unique Ideas to Try Today!
Explore 10 creative paper bag crafts for kids. Fun, easy, and eco-friendly projects to spark imagination!

Looking for something fun and creative to do with your kids? Paper bag crafts are a fantastic way to entertain them and let their imaginations run wild. You don’t need much—just some paper bags, a few art supplies, and a bit of creativity. Plus, these crafts are perfect for all ages. Whether it’s a lazy afternoon or a rainy day, these ideas will surely bring smiles and laughter to your home. So grab those paper bags and let’s get crafting!
Key Takeaways
- Paper bag crafts are easy and require minimal supplies.
- These crafts are perfect for kids of all ages.
- Great for rainy days or quiet afternoons.
- Encourages creativity and imagination.
- Eco-friendly and budget-friendly activity.
1. Smiling Lion
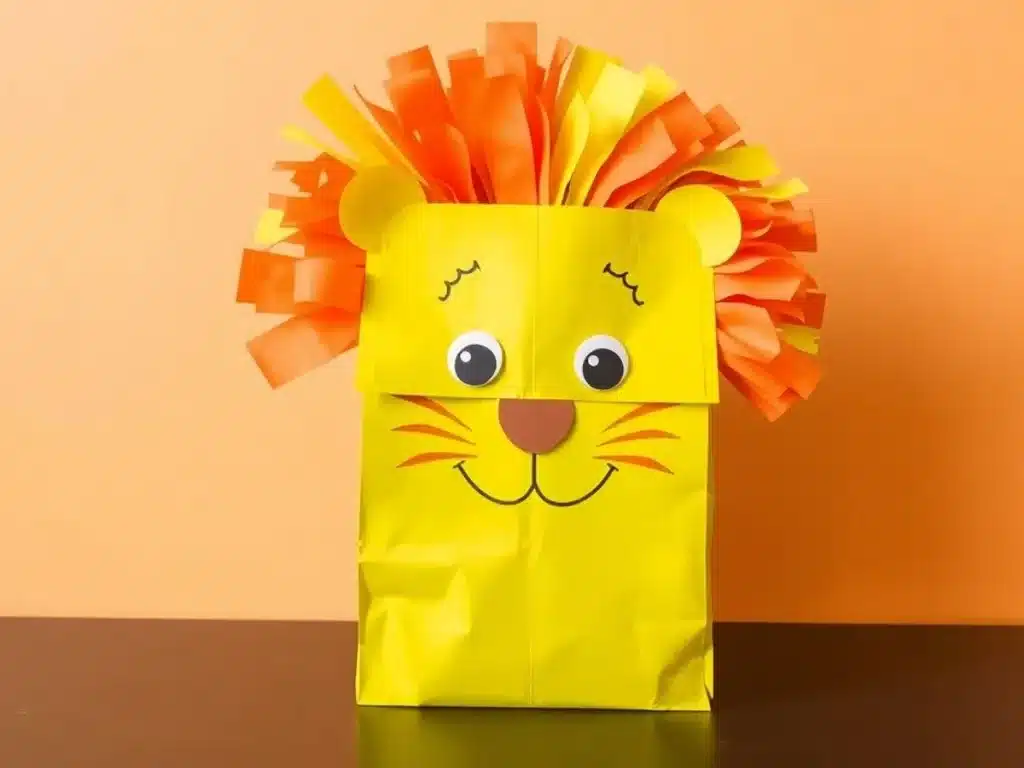
Creating a smiling lion from a paper bag is an exciting and simple craft that can delight kids of all ages. This project is perfect for an afternoon of creativity, offering a fun way to explore art and expression.
Materials Needed
- Paper bag
- Yellow and orange construction paper
- Glue stick
- Scissors
- Black marker
- Googly eyes (optional)
Step-by-Step Instructions
- Prepare the Mane: Cut strips of orange construction paper. These will form the lion’s mane, so make them long enough to frame the top and sides of the paper bag.
- Attach the Mane: Glue the strips around the top of the bag, letting them fan out like a lion’s mane.
- Create the Face: Cut out a circle from the yellow construction paper for the lion’s face. Glue it to the front of the bag.
- Add Details: Use the black marker to draw a nose and mouth on the yellow circle. Glue on googly eyes or draw eyes with the marker.
- Final Touches: Use construction paper or markers to add any extra details, like whiskers or a tongue.
Tip: Encourage kids to use their imagination by adding unique features to their lions, like a bow tie or a crown. This not only makes the activity more engaging but also helps them express their individuality.
This smiling lion craft is a fun activity and a wonderful way to encourage storytelling and imaginative play. Kids can use their lion puppet in a variety of creative paper plate crafts for kids to expand their playtime adventures.
2. Chirpy Bird
Crafting a chirpy bird out of a paper bag is a delightful way to keep kids entertained and creative. This project is simple enough for little hands but can also be jazzed up for older kids who love to add extra details.
Start by gathering your supplies: a paper bag, colored construction paper, glue, scissors, and markers. If you have feathers or googly eyes, even better!
Steps to Create Your Chirpy Bird
- Prepare the Bag: Turn the paper bag upside down so the flap is on top. This will be your bird’s head.
- Make the Beak: Cut out a triangle from yellow construction paper and glue it onto the flap for the beak.
- Add Eyes: Draw eyes with markers or stick on googly eyes just above the beak.
- Create Wings: Cut out wing shapes from colored paper and attach them to the sides of the bag.
- Decorate: Use markers to draw feathers or patterns on your bird. You can also glue on real feathers for a fluffy touch.
Tip: Let your child pick the colors and patterns for their bird. This not only makes the bird unique but also helps them express their creativity.
Once your bird is complete, it’s ready to flutter around the house or join other imaginative paper crafts in a playful display. This project sparks creativity and helps improve fine motor skills as kids cut, paste, and decorate their chirpy friend.
3. Fluttering Butterfly
Creating a paper bag butterfly is a delightful craft that lets kids express their creativity and have fun. The beauty of this project is its flexibility, allowing kids to personalize their butterflies with vibrant colors and patterns. Here’s a simple guide to get you started.
Materials Needed
- Paper bags
- Construction paper or a printable template
- Scissors
- Glue or tape
- Markers or crayons
- Pipe cleaners (optional for antennae)
Instructions
- Prepare the Paper Bag: Start by flattening the paper bag. This will be the body of the butterfly.
- Create the Wings: Using construction paper or a printable template cut out two large wing shapes. Let your child decorate them with markers or crayons.
- Attach the Wings: Glue or tape the wings to the back of the paper bag, positioning them just below the top edge.
- Add Details: Draw or glue your eyes onto the top of the bag. You can also use pipe cleaners to create antennae by taping them inside the top of the bag.
- Decorate Further: Encourage your kids to add more details like dots, stripes, or any patterns they fancy.
Crafting butterflies from paper bags not only sparks creativity but also enhances fine motor skills. It’s a fun way to spend an afternoon while making something beautiful.
This craft is perfect for a rainy day or a creative afternoon at home. Let your kids’ imaginations fly as they design their own butterflies.
4. Roaring Dinosaur
Creating a paper bag dinosaur is a fantastic way to let kids’ imaginations run wild. This craft project is about transforming a simple paper bag into a prehistoric creature that’s fun and educational.
Materials Needed
- Paper bag
- Green paint or tissue paper
- Glue
- Scissors
- Black marker
- Construction paper (for claws and teeth)
Instructions
- Prepare the Bag: Start by painting the paper bag green or covering it with green tissue paper squares. Let it dry completely before moving on.
- Create the Dinosaur’s Face: Use a black marker to draw eyes near the fold of the bag. Cut out sharp teeth from white construction paper and glue them inside the bag’s flap.
- Add Details: Cut out claws from black construction paper and glue them onto the sides of the bag for arms. You can also add spikes along the back using small construction paper triangles.
- Finishing Touches: Let your child add any details they want, like spots or scales, using markers or extra paper.
“This paper bag dino lets out a roar with its wide-open mouth, sharp claws, and cool green color. It’s ready for action anytime your kids want to go all the way back to prehistoric times!”
For a slightly different take, you can also create a fun dinosaur puppet using a small paper plate and tissue paper for a colorful and easy craft project perfect for preschoolers. Kids love this roaring dinosaur craft because it’s easy to make and brings their favorite prehistoric creatures to life.
5. Sleepy Sloth
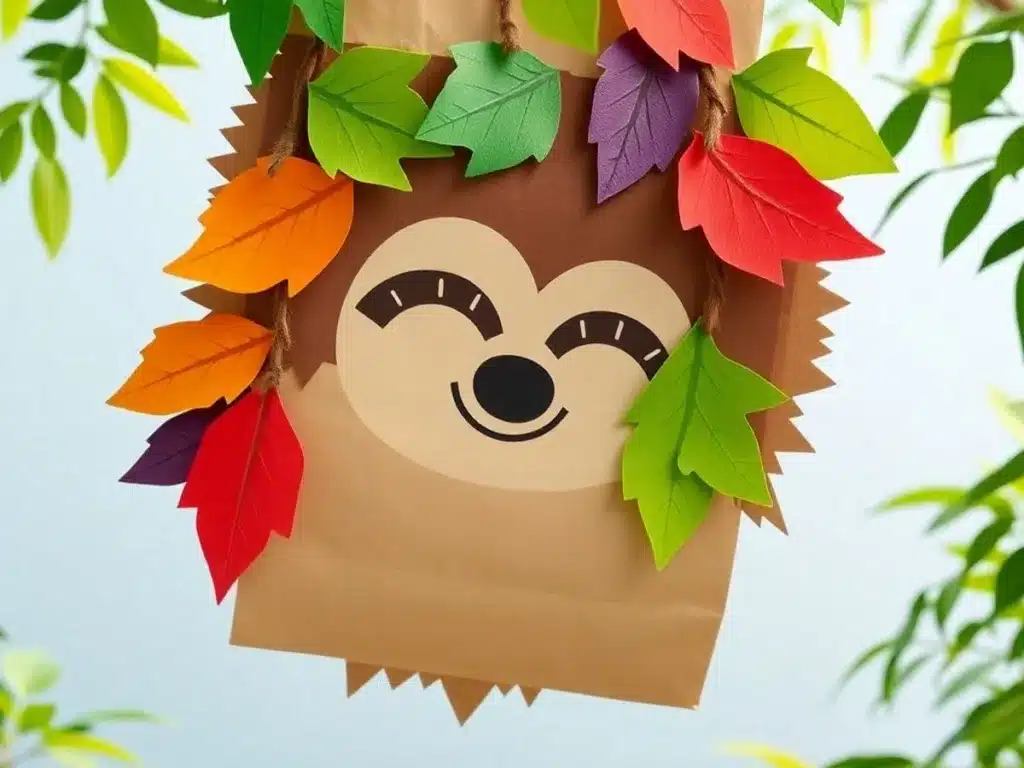
Creating a paper bag sloth is a delightful way to add a touch of whimsy to your crafting time. This project is not just fun but also a fantastic opportunity to use up some of those leftover materials you might have lying around. Kids will love the cuddly and calm vibe of their sleepy sloth creation.
Materials Needed
- Paper bag (preferably brown)
- Brown and cream construction paper
- Glue stick or craft glue
- Scissors
- Black marker
- Cardboard (recycled from old boxes)
Instructions
- Prepare the Bag: Start with a plain brown paper bag. This will be the body of your sloth.
- Create the Face: Cut out a round shape from the cream construction paper for the sloth’s face. Use the black marker to draw sleepy eyes and a small nose.
- Add the Fur: Tear or cut strips of brown construction paper and glue them onto the bag to mimic the sloth’s fur.
- Make the Arms and Legs: Use the leftover cardboard to cut out long arms and legs. Sloths have long limbs, so make them nice and lengthy!
- Attach the Claws: Cut small claw shapes from the cardboard and attach them to the arms and legs.
- Assemble Your Sloth: Glue the face onto the top of the bag, then attach the arms and legs on the sides and bottom.
Crafting a paper bag sloth is a simple yet rewarding activity that brings smiles to little faces. It’s a great way to transform empty toilet paper rolls into creative and eco-friendly crafts, making it perfect for those who love to recycle and reuse materials.
6. Paper Bag Kites
Creating paper bag kites is a delightful way to spend a breezy day with kids. It’s not just about flying them; it’s the joy of crafting something unique and personal. Plus, you probably have most of the materials lying around the house!
Supplies Needed:
- Paper lunch bags
- Yarn or strong string
- Popsicle sticks
- Scissors
- Streamers
- Tape
- Embellishments: Stickers, paints, markers, crayons, construction paper, washi tape
Steps to Make Your Kite:
- Decorate the Bag: Let the kids unleash their creativity by decorating the paper bags. Use paints, markers, or even stickers to add some flair. The more colorful, the better!
- Prepare the Bag: Cut a small hole at the bottom center of the bag. This hole will be for the string.
- Attach the String: Cut a piece of yarn or string about 18-24 inches long. Tie one end to a popsicle stick and push the other end through the hole in the bag. The popsicle stick acts as an anchor, preventing the string from slipping through.
- Add Streamers: Tape streamers to the open end of the bag. These will flutter as the kite dances in the wind.
- Time to Fly: Find a nice open space and let the kids run with their kites. Watch them soar!
“The beauty of paper bag kites is in their simplicity. With just a few materials, children can create something magical that dances in the sky.”
Making paper bag kites is an activity that brings smiles and laughter. It’s a perfect blend of creativity and outdoor fun, making it a fantastic project for all ages. So grab those paper bags and get ready to fly!
7. Advent Calendars
Creating an advent calendar out of paper bags is a delightful way to countdown to the holidays and a fun craft project for kids. This activity is not only easy but also allows for a lot of creativity and personalization. Here’s a step-by-step guide to making your own advent calendar using paper bags:
- Gather Your Materials: You’ll need 24 paper bags, some ribbon, a hole punch, glue, and decorative items like stickers, glitter, or colored pens.
- Number the Bags: Write or print numbers 1 through 24 on small pieces of paper. Stick these numbers on each bag to represent each day leading up to Christmas.
- Decorate the Bags: Let the kids go wild with creativity. They can use paints, markers, or any craft supplies they have at home to decorate each bag differently.
- Fill the Bags: Add a small gift or treat inside each bag. This could be anything from a piece of candy to a small toy or a note with a fun activity.
- Seal and Hang: Punch holes at the top of each bag and thread the ribbon through. You can hang these along a wall or across a mantle.
Advent calendars are a wonderful way to bring excitement and joy to the holiday season. This DIY project also encourages kids to use their imagination and enjoy the festive spirit.
For more inspiration on paper crafts, you might want to explore other adorable paper crafts that are perfect for any occasion.
8. Paper Bag Masks
Crafting Your Own Paper Bag Mask
Paper bag masks are a classic craft that never goes out of style. They’re fun, easy to make, and allow kids to explore their creativity. Here’s how you can make your paper bag mask with some simple materials you probably already have at home.
Materials Needed:
- Brown paper bags (one for each mask)
- Scissors
- Glue
- Markers, crayons, or paint
- Decorative items like feathers, buttons, or fabric scraps
Steps to Create:
- Prepare the Paper Bag: Start by cutting out holes for the eyes. Place the bag on your child’s head to mark where the eyes should be, then cut out the holes.
- Cut and Decorate: Let your kids cut out shapes from colored paper or use markers to draw features like a nose, mouth, or even eyebrows. Encourage them to be as creative as they want.
- Add Decorations: Glue on any extra decorations like feathers or fabric scraps. This is where they can really personalize their mask.
Tip: If your child isn’t comfortable using scissors, they can tear the paper instead. This not only adds a unique texture to the mask but also helps develop fine motor skills.
Playtime Fun:
Once the masks are complete, they can become a part of your child’s imaginative play. Whether they pretend to be superheroes, animals, or characters from their favorite stories, these masks can transform playtime into an adventure.
For more creative paper crafts, check out our collection of projects that are perfect for sparking your child’s imagination.
9. Paper Bag Puppets
Creating paper bag puppets is a fantastic way to spark creativity and storytelling in kids. These simple crafts transform a basic paper bag into a lively character ready for imaginative play. Here’s how you can make your own delightful puppets at home.
Materials Needed
- Paper bags
- Construction paper
- Glue or tape
- Scissors
- Markers or crayons
Steps to Make Your Puppet
- Choose Your Character: Decide whether your puppet will be an animal, a person, or a mythical creature. This step sets the stage for the rest of your creation.
- Design the Face: Use markers or crayons to draw the puppet’s face on the bottom flap of the paper bag. You can also cut out facial features from construction paper and glue them on.
- Add Details: Cut out shapes from construction paper for ears, wings, or hats. Attach them to your puppet using glue or tape.
- Dress Your Puppet: Use construction paper to create clothing or other body details. Wrap the paper around the bag and secure it.
- Final Touches: Add any extra embellishments like buttons, yarn hair, or stickers to bring your puppet to life.
Paper bag puppets are not just crafts; they’re gateways to a world of imagination and fun for kids. They can create stories, act out scenes, and even put on a puppet show for family and friends.
Making colorful paper bag puppets is an engaging activity that enhances fine motor skills and hand-eye coordination. It’s a perfect project for a rainy day or just for fun! Kids will love the chance to tell stories with their very own puppet creations.
10. Paper Bag Wreath
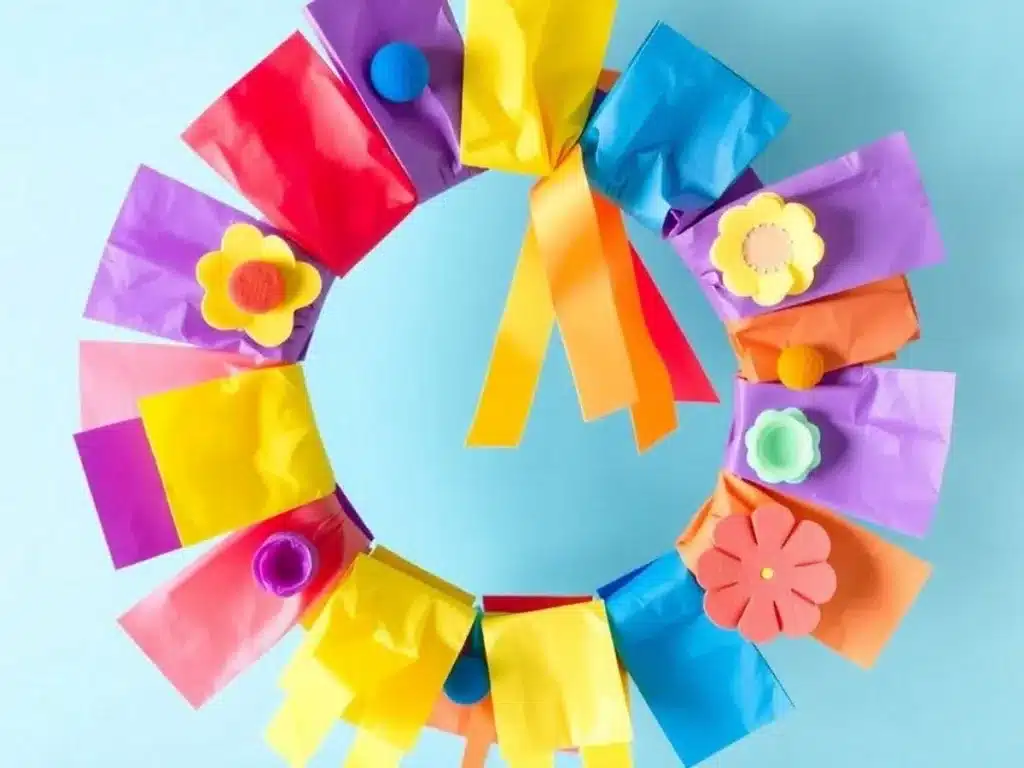
Creating a paper bag wreath is a delightful way to bring a touch of creativity and fun into your home decor. It’s a perfect project for kids and adults alike, combining simplicity with a touch of elegance. Here’s how you can craft your very own paper bag wreath:
- Gather Your Materials: You’ll need a sturdy cardboard base, brown paper bags, scissors, glue, and any embellishments you like, such as dried leaves or colourful feathers.
- Prepare the Base: Cut a circular shape out of the cardboard to serve as the foundation for your wreath. Make sure it’s the size you want your final wreath to be.
- Cut the Paper Bags: Cut your paper bags into strips. These will form the layers of your wreath, so aim for strips that are about an inch wide.
- Twist and Attach: Twist each strip of paper to give it a textured look. Glue the twisted strips around the cardboard base, layering them to create a full, lush appearance.
- Add Decorations: Once your base is covered, it’s time to decorate. Use your chosen embellishments to add pops of color and interest. This could be anything from a fun and easy paper bag gingerbread house garland to simple dried flowers.
Crafting a paper bag wreath is not just about the final product, but the joy of creating something beautiful from simple materials. It’s a chance to let your creativity shine.
With these steps, your paper bag wreath will be a charming addition to any room, offering a handmade touch that’s both unique and heartwarming.
Wrapping Up Our Paper Bag Adventure
So there you have a bunch of cool paper bag crafts to keep the kids busy and creative. These projects are not just fun, but they also help kids learn and grow. Plus, they’re a great way to recycle those paper bags you have lying around. The possibilities are endless, whether it’s making a puppet, a kite, or a mask. So grab some paper bags and let the creativity flow. Who knows, you might have as much fun as the kids! Happy crafting!
Frequently Asked Questions
What materials do I need for paper bag crafts?
You’ll need paper bags, glue, scissors, markers, and decorations like stickers or paint.
Are paper bag crafts safe for young kids?
Yes, they’re safe, but always supervise young children when using scissors or glue.
How can I make my paper bag craft last longer?
Use sturdy paper bags and let all glue and paint dry completely before handling.
Can I recycle the paper bags after crafting?
Yes, if the bags are not too soiled, they can be recycled.
What age group are paper bag crafts suitable for?
These crafts are great for kids aged 4 and up, with adult help for the younger ones.
How do I store completed paper bag crafts?
Keep them in a dry place, away from direct sunlight, to prevent fading or damage.